 Windows: I have written Windows software based on John's Mac software that allows you to download pictures, clear the camera's memory so that you can use it again and again, and perform memory and register dumps.
 The Dakota Digital Camera is one of several inexpensive ($10.99 MSRP) single-use digital cameras currently on the market in the US. Picture quality is a bit lacking, but acceptable for Web images and the like, and certainly not bad for the price. These are available at participating Ritz or Wolf Camera stores, or can be ordered by phone at 1-877-690-0099 (no online ordering, apparently). The camera is easily adapted from single-use to many-use following the instructions below, and is powered by two easily-replaced AA batteries. While they are sold with the intention that you return them at some point for processing (they give you prints and a photo CD, but keep the camera), there is nothing (no contract, rental agreement, deposit, etc.) that actually requires you to return it--once you buy it, it's yours to do with as you please.
For the more adventurous, Rodrigo has also written a firmware update that makes a number of improvements over the 'official' Dakota firmware version 1.42.6.0. This update removes the 25-picture limit, makes the picture counter show the number of pictures taken (not remaining), ensure that picture filenames always start at '1' after a memory clear (and the numbering stays consistent even if you delete shots), and corrects a bug in the original firmware that can result in two pictures having the same filename (causing one of them to be impossible to download).
Although not officially listed there (yet), the author is now working on allowing user code (e.g. compiled in C) to be downloaded and executed from the camera's RAM. Now you can run Linux on your camera? Probably not (memory is too small!), but you could do a lot of other neat stuff, maybe motion detection, image processing or other custom applications.
You can check out all these updates at http://www.balerdi.com.ar/dakota/.
Pin 10: Ground (Black)
Pin 9: Data - (White)
Pin 8: Data + (Green)
Pin 6: +5V (Red)
The colors listed are the standard color-codings of the appropriate USB cable wires. The contacts are numbered by the "1" and "10" on either side of the edge connector. You can either solder the wires of a USB cable directly to these edge contacts, (better) solder your own connector into the camera and a matching connector on the end of your USB cable, or (best) find a connector that already fits the edge connector with no soldering required. The Palm connector is a close mechanical fit for the camera's connector, so many of the homebrew cables begin their lives as Palm cables (be warned, there are many different variations of this cable). Tutorials for modding various cables for use with the Dakota are available online:
It would be wonderful to find a source that can distribute the 'official' connector/cable (used by Ritz Camera) to us mere mortals (hint, hint).
NB: Don't get ripped off buying a USB cable (only to cut one end off of it) at well-known computer and appliance outlets such as my fictional store, BestCircuitDepotUSA. (Particularly avoid any place that also sells USB printers and scanners; these will artificially inflate the price of the cable to make up for slim margins on the printers, which are intentionally sold cable-less.) You will spend substantially more for the cable (avg. cost $20) than you did for the camera. Try cablesforless.com (avg. cost $2) instead.
Macintosh: Maushammer has written a Mac program to download pictures from the cam. This program allows you to download pictures, clear the camera's memory so you can use it again and again, and supports advanced developer/hardware hacker features such as raw memory and register dumps.
Windows: I have written Windows software based on John's Mac software that allows you to download pictures, clear the camera's memory so that you can use it again and again, and perform memory and register dumps.
Unix/Linux: gPhoto, a Linux program supporting over 400 makes of digital camera, is expected to soon have full support for the Dakota camera. Until the new code is merged, you can grab updated copies of the relavent gPhoto files from John's Dakota page.
Additionally, this driver lets you use the camera in Webcam mode under Linux.
Despite claims heard that the camera is 2 megapixels, it is actually 1.3MP, and produces images with a size of 1280x960 pixels and average file size of about 400kb (although this varies greatly depending on the subject matter). Like many digital cameras, the pictures are somewhat darker than one would expect, and often can benefit from some lightening or gamma-correction tweaks from your preferred photo editing software.
Don't expect a lot of detail or clarity from your pictures (a paraphrase that comes to mind is "Unclear at any distance"); do expect some visible JPEG artifacts on certain shots as the cam tries to guarantee that 25 pictures will fit into 16MB (or slightly less) of flash memory.
Sample images
Here is a page with a few sample images from my first (unadjusted) camera. I've taken a lot of shots that are better and worse than those displayed here. Most of the good ones involve human subjects who might not want their pictures on the Internet, and thus are not shown here.
I also have more samples from a camera where the lens has been adjusted as detailed in the following section.
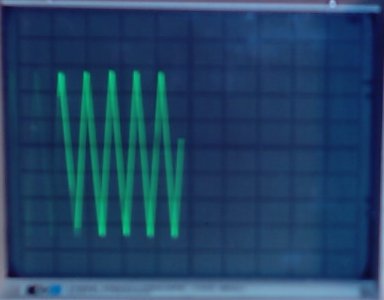
Since I have noticed substantial motion blurs in some of my pictures, I figured I would measure the exposure length experimentally. The camera's "shutter speed" appears to be about 70-75 ms, or about 1/13 of a second both in medium light and extreme darkness; lighting level does not seem to have an effect. (These pictures are of a 'scope at 0.02sec/div; to my surprise, this actually turned out to be an acceptable speed indicator, relatively unaffected by residual phosphor glow.)
For reference, many professional photographers will insist on the use of a tripod at speeds slower than 1/60 sec. To avoid introducing more blur than usual, make sure the camera is held as still as possible.
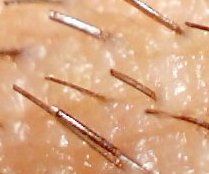 The lens of the Dakota/Walgreens cameras is adjusted at the factory, then secured in place with a blob of clear glue. A metal spring between the lens and what it screws into also helps hold it in adjustment. It is probably adjusted for 'infinity' or near enough to it, but if you cut/dig/chip away the glue, you can rotate the lens to adjust the camera's focal length. Turn clockwise to focus far, and counterclockwise to focus near--up to within an inch or so of the lens! Note that if you turn the lens counterclockwise (unscrew it) far enough, it will come off in your hand and you'll have to screw it back in. With the lens completely removed like this, you get a nifty view of the CMOS image sensor, but will not be able to take any discernible pictures.
By performing this adjustment, it is possible to take crystal-clear pictures at a wide range of distances. However, you will then be limited to taking pictures only at that distance without adjusting the lens again, as the sweet spot is very narrow. What I have done is pick up two Dakota cameras, leave one focused as-is (infinity), and adjust the other to about 10 inches for close-up work.
I have heard from someone who modded their camera so that the lens can be adjusted on the fly. See here ("$10 digital camera" link).
Check out John's flash-storage-format page for an in-depth look at the organization of memory and files. This steps through a by-hand recovery of files, and even an attempt at recovering a previously deleted file. While that was being written, I was also hard at work on some quicker n dirtier documentation of FAT12 and how to read files from it.
While the filesystem is standard enough, the physical locations of data on the chip are all over the place. Luckily, this is also standard; this randomish placement of data (known as wear-leveling) ensures that each block of memory on the chip has data written to it an equal number of times (or as equal as possible, anyway). This is because Flash memory bits can only be written a finite number of times--although each bit is rated to be reliably written over a million times, it makes no sense to use the same bits over and over, wearing them out, while others sit relatively unused. John's site also covers remapping the wear-leveled data.
Idle = 0, (sitting on your USB port doing nothing)
What we are most interested in is the Webcam (PcCamera) mode. Videoclip mode (takes short videos instead of still pictures) would be nice as well; but it can only be set while the camera is tethered to a computer, where it will not allow any picture taking. Once the camera is disconnected from the computer, it reverts immediately to Still Camera mode. The rest of the modes are already available and serve their purpose in the usual course of using the camera.
There are two commands that can be used to set the camera's mode via USB; they are bRequest 0x31 and 0x32, with the mode plus one specified as the wIndex argument. 0x31 messes with one of the 8051's timers, and 0x32 pretty much just sets the mode (the purpose of the timer-messing is unknown). For example, under libUSB, you would set Mode 3 (Webcam) using:
usb_control_msg(cam, 0x41, 0x32, 0x0000, 0x0004, NULL, 0, 5000);
Once placed in Webcam mode, the 'Ready' light on the camera will blink on and off rapidly, until the mode is changed to something else. During this time, the camera will continuously pump out frames of what appears to be very raw JPEG data (missing headers, q-tables, etc.). If the image in front of the lens is changing, the 'Ready' LED will blink at half the rate it does when the image is static. The Webcam mode appears to use the Isochronous (ISO) USB transfer mode, which is unfortunately not supported by libusb (and I don't have the time or skill to create a fullblown Windows USB driver). As mentioned previously, there is a working driver for Linux, but having a Windows version as well would be nice since that's what most people are running. This will require (first off) a USB driver that supports isochronous transfer.
I apologize if I have forgotten anyone here - quite a few people and sites have been involved, and/or contributed in some way to the success of this project; almost too many to keep track of.
Now if I just get the new one hacked and post it to Slashdot, maybe it'll get me a geek girl? (Note to self: don't make freaky stuff like this the first images hacked out of the camera, unlike last time :-) Now there would be a luck story if ever there was one. I'd have to start carrying a Dakota with me at all times as a sort of lucky rabbit's foot.
Webcam Mode
The camera uses several different 'modes' to perform its operations. In one mode, it is functioning as a camera and taking pictures; in other modes, it is idle, or uploading files, etc. The full list of modes consists of:
DSC = 1, (Digital Still Camera; e.g. taking pictures the normal way)
VideoClip = 2,
PcCamera = 3,
Upload = 4 (bulk transferring pictures)
(that is, Out (host -> device), bRequest 0x32, wValue dont-care, wIndex 0x0004)To do list
Some things I would like to try with the camera:
Credits
What you see here is the result of hard work by a number of interested hardware hackers around the world. Besides the obvious appeal of being able to pick up a fully digital camera for $11 and not have to worry about using it in hazardous or high-risk situations, this was done simply to see if it could be done; a project for a rainy day (or a lot of them :-)
The Aftermath
After news of this hack hit Slashdot, a popular nerd-news portal, my formerly out-of-college-and-jobless ass received an offer from a technology R&D company just outside Boston, MA. Yep, you read that right, $11 cameras and Slashdot got me an interview, and ultimately a job here in sunny (when it isn't raining) Medford, where I unleash my wrath upon unsuspecting microcontrollers, blow up some stuff on occasion, and geek out with reckless abandon (current extra-curricular activity: homebrew MP3 player).
(Deprecated)
Before the method of enabling bulk transfers was discovered, we were extracting picture data 1 byte at a time by reading out the entire contents of the 16MB FLASH chip, a 10-hour process. John wrote a program called flashdump2iso.c which unscrambled the wear-leveled memory contents to an ISO filesystem image that could then be mounted on Macs as-is, or on Linux (after removing the blank space the cam leaves at the beginning). I then wrote a program called chewfat.cpp (Windows binary here) that extracts the pictures files from the ISO, for those who don't want to (or can't) mount ISOs as drives on their OS.